Today was a snow day. Both my work and my husband's work were open, but with 2 hour delays. Leaving the children unattended since day care and preschool were closed was not an option. The coin was tossed and it was unanimously decided by the husband that I was to stay home. There really was no coin. Apparently he lives by Sheldon's rule of voting. (The Roommate Agreement, Controversial Clauses) Anywho, I settled in for the day. Got a solid 3 hours of work in before having to fly solo for the day, so one could say that I was "successfully working from home." Hey, I got to drink a hot cup of coffee. That's rare, even at work.
Sunday, the decision had been made to make meatloaf this week. I had defrosted the meatloaf trio (pork, veal, beef) and it was just sitting cold, waiting to go. Sunday ended up as New England Boiled dinner with family. Monday, well Monday went the way of Kraft for the kids and Chinese for us. Which meant, meatloaf HAD to be tonight.
Now, if you've ever had to work from home with a 5 year old and a 2 year old, you know that the day never goes as planned. While you may not actually get dressed, you still get absolutely nothing done, due to the cost of dedication to connect and check e-mail. My oldest is thankfully now at an age where I can somewhat trust that's she OK in her room doing her thing. Of course, recent history has proven this statement wrong as we have found marker on floors, doors, walls and clothes, but hey, she's learned her lesson by now...... right? God I hope. The 2 year old however, it another ball game altogether. Can't take my eyes off her for a minute! So knowing the day was not going to be easy, I knew I wasn't going to want to deal with dinner at 5, let alone anything later like 6 or even 7. And I couldn't go another night with not cooking. We've had take out, or hot dogs, nuggets and whatnot far too much recently. So meatloaf had to be cooked, today.
Light bulb! Crock pot. That wonderful invention of 8 hour slow cooking. Toss everything in, set it, forget it, and love it later. I personally grew up on crock pot food. My mom made the BEST pot roast in the world. No man (or woman for that matter) could out do her roast. And even though I have the recipe, it still doesn't hold a flame to hers. So, a quick google search produced that you can, indeed, actually cook a meatloaf in the crock pot. How interesting. It shall be done.
So. Mixed up my meat. Formed said loaf. Dropped it into the bottom of the pot. Turned it on. Walked away. . . . Wait. What about sides? I don't want to have to worry about that later. Ugh. Now what? Well, it's a crock pot, throw stuff in! Turned off the crock, pulled out the loaf. Rummaged through my cabinets and fridge. Produced a couple of carrots, a few yellow potatoes and a turnip (aka. rutabaga depending on what side of the Mississippi you live on) Peeled, chopped big and put them in the bottom (after spraying with cooking spray). Hrm.. now the loaf. Going back into my cabinets, I produced the inside of a 2 piece meatloaf pan. You know, the ones where the juices are supposed to run through but just down into the other pan? Balanced that baby on top of the veggies inside the pan and still had room to put the lid on. Voila. Yeah, this'll work! Turned the crock pot back on, set for 8 hours.
5:30 all was done. House smelled good. Meatloaf temp was right! Veggies were done.
The verdict? The 5 year old devoured it, no ketchup. The 2 year old, yeah well she's 2, so between the ups and downs in her seat she eventually ate all of it. Husband.. ate it! Didn't love it, but certainly did not get the reaction I did with the apple-sauce pork.
As the creator... I have to say it wasn't terrible. The veggies were great! I had modified my recipe for the meatloaf (again) and left out a few things like the chopped mozzarella, so the loaf dried out a bit. Changes for the next time I do this, and there WILL be a next time, would be to make sure i have the mozzarella in there, and I think I will be putting the loaf right into the pot, no extra pan so it can stew in it's own juices, and pile the veggies around them.
Good experiment. Fun to play and was for sure a time saver.
Tuesday, March 19, 2013

Tuesday, February 26, 2013
Not Your Average Chicken & Corn Chowder
Every once in a while I get in the mood for soup. Which is great, because soup is so easy to make, and there are so many different ways to make the same soup, adjusting ingredients to your individual liking or taste at the time. I don't think I've ever made the same soup twice. The bad part is, I have yet to figure out how to make soup for 1, with a couple nights' leftovers. When you make soup, you make for the masses. One of these days I will have to master how to make soup for 5, and not 25. See, I'm the only one in the household who will eat soup. 5 year old girls tend to be picky eaters at this phase, 2 year olds don't yet have the ability to manage it on a spoon, and well husbands... the one in my house just doesn't like soup. And that's OK. More for me!
Several weeks ago, some time around Valentine's Day, my mother in law throws this really fun party for the adult women of the family. Much laughter, as you can imagine. This year, I was unable to attend, but was there to drop my girls off for the afternoon. Her menu for the party that day included Corn Chowder. She makes a great corn chowder. After finishing two and a half bowls of it quickly before we had to leave, I was determined to get it on the menu at my house in the following weeks. And wouldn't ya know... Sunday night, I made a roast chicken. How convenient for me, now I can make my own stock. Score!
I like chicken in my corn chowder. Growing up, my dad was a Boy Scout Executive leader, and there was this one troop that had a chicken and corn chowder meal every year. Raising funds for some project or another. Well, the gentleman who was in charge of making the chicken and corn chowder had the most amazing recipe. I have never had another like it. So I always think back to that, and eventually I will find my recipe falling into that memory.
So, last night was Chicken & Corn chowder. I didn't even bother with a recipe, I figured I could get it close enough. I had a general idea of what is supposed to go into it and what it supposed to taste like. I must say, I was right on.
Chicken Stock
One leftover roast chicken. Put it in a large pot, fill with water to just 1 inch over the height of the bird, and boil it for about 3 hours. Not a high boil, but a medium simmer. You shouldn't have to add too much extra flavoring to this, since your chicken should have already had flavor to it when you roasted it. We're going to add flavor to this stock later anyhow when we make it soup. Once the 3 hours are up, you'll want to drain the stock into a collander over another large stock pot or bowl to save for later. Keeping the bones out, but retaining the stock.
SOUP Time!
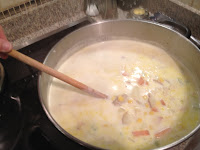
Ingredients
4-6 cups chicken stock
Chicken, shredded or cut into small pieces (as much as you like)
4-6 carrots (chopped to 1/2 inch pieces or smaller)
4-6 celery stalks (chopped to 1/2 inch pieces or smaller)
1 medium vadallia onion (chopped to 1/2 inch pieces or smaller)
2 cans sweet corn
1 can creamed corn
1 dozen small (golf ball size) red potatos - can't find the golf ball size, then adjust accordingly - chop in to bite size pieces
1 pint Light Cream
Olive Oil
Salt/Pepper
In the bottom of a stock pot, drizzle the olive oil and heat to med-high heat. Add your carrots, celery and onion. This is a classic mirepox, or the holy trinity, of soup. Some people use this in just making the stock only and then dispose of it. In this case, I like a colorful soup. If it's not fun to eat, then why eat it? I decided to leave these in.
Add salt and pepper. Saute over medium heat until they are soft and the onions become translucent. Don't rush this part, the longer they sit and marry, the better the flavor. If you get a touch of burning on the bottom, that is ok, it's not actual burning, it's "fond" which I've talked about in past posts. You'll scrape this off once you add the stock.
Once the mirepox is soft and translucent, add the corn and creamed corn. Give them a good stir and let saute for just a moment. Then add your chicken stock. So how much? How thick do you like your chowder and how much soup are you making? Start by adding 4 cups and go from there. After you add just 4 cups of stock, add the whole pint of light cream. Stir everything together. If you need more stock, adjust accordingly as you add the potatoes and chicken. Bring the heat to high to boil 1-2 minutes, watching not to burn the milk. Turn back to low and simmer until potatoes are tender.
Remove from heat, let cool so you don't burn your tongue... enjoy!
Several weeks ago, some time around Valentine's Day, my mother in law throws this really fun party for the adult women of the family. Much laughter, as you can imagine. This year, I was unable to attend, but was there to drop my girls off for the afternoon. Her menu for the party that day included Corn Chowder. She makes a great corn chowder. After finishing two and a half bowls of it quickly before we had to leave, I was determined to get it on the menu at my house in the following weeks. And wouldn't ya know... Sunday night, I made a roast chicken. How convenient for me, now I can make my own stock. Score!
I like chicken in my corn chowder. Growing up, my dad was a Boy Scout Executive leader, and there was this one troop that had a chicken and corn chowder meal every year. Raising funds for some project or another. Well, the gentleman who was in charge of making the chicken and corn chowder had the most amazing recipe. I have never had another like it. So I always think back to that, and eventually I will find my recipe falling into that memory.
So, last night was Chicken & Corn chowder. I didn't even bother with a recipe, I figured I could get it close enough. I had a general idea of what is supposed to go into it and what it supposed to taste like. I must say, I was right on.
Chicken Stock
One leftover roast chicken. Put it in a large pot, fill with water to just 1 inch over the height of the bird, and boil it for about 3 hours. Not a high boil, but a medium simmer. You shouldn't have to add too much extra flavoring to this, since your chicken should have already had flavor to it when you roasted it. We're going to add flavor to this stock later anyhow when we make it soup. Once the 3 hours are up, you'll want to drain the stock into a collander over another large stock pot or bowl to save for later. Keeping the bones out, but retaining the stock.
SOUP Time!

Ingredients
4-6 cups chicken stock
Chicken, shredded or cut into small pieces (as much as you like)
4-6 carrots (chopped to 1/2 inch pieces or smaller)
4-6 celery stalks (chopped to 1/2 inch pieces or smaller)
1 medium vadallia onion (chopped to 1/2 inch pieces or smaller)
2 cans sweet corn
1 can creamed corn
1 dozen small (golf ball size) red potatos - can't find the golf ball size, then adjust accordingly - chop in to bite size pieces
1 pint Light Cream
Olive Oil
Salt/Pepper
In the bottom of a stock pot, drizzle the olive oil and heat to med-high heat. Add your carrots, celery and onion. This is a classic mirepox, or the holy trinity, of soup. Some people use this in just making the stock only and then dispose of it. In this case, I like a colorful soup. If it's not fun to eat, then why eat it? I decided to leave these in.
Add salt and pepper. Saute over medium heat until they are soft and the onions become translucent. Don't rush this part, the longer they sit and marry, the better the flavor. If you get a touch of burning on the bottom, that is ok, it's not actual burning, it's "fond" which I've talked about in past posts. You'll scrape this off once you add the stock.
Once the mirepox is soft and translucent, add the corn and creamed corn. Give them a good stir and let saute for just a moment. Then add your chicken stock. So how much? How thick do you like your chowder and how much soup are you making? Start by adding 4 cups and go from there. After you add just 4 cups of stock, add the whole pint of light cream. Stir everything together. If you need more stock, adjust accordingly as you add the potatoes and chicken. Bring the heat to high to boil 1-2 minutes, watching not to burn the milk. Turn back to low and simmer until potatoes are tender.
Remove from heat, let cool so you don't burn your tongue... enjoy!
Thursday, February 14, 2013
Hazelnut Cream Martini
After a day of pushing the sweetest cupcake I have ever made, I felt the need to make a sweet drink to end the night. I never go off recipes but just open my cabinet, take out random bottles that might go together and shake. Here's what tonight came up with. The Hazelnut Cream Martini. I know that calling this a "martini" is sacrilegious in the martini community because this is really a "cocktail" served in a martini glass. But at 6:15pm being home from a long day, who's splitting hairs? So let's drink.
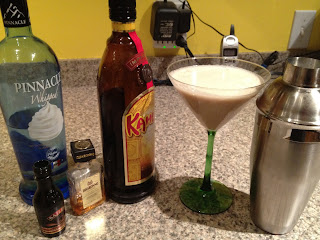 Ingredients:
Pinnacle Whipped Cream Vodka
Hazelnut Bailey's
Disaronno
Kahlua
Milk/Cream
How to put it together:
In a shaker, toss in 3 pieces of ice.
After that, slosh in some vodka. If I had to wager a guess, 1 shot
Then, splash of Kahlua, probably 1/2 shot
As you can see in the picture, I used a nip of Baileys.. this is 5mL (or roughly 1.25 shot)
Disaronno, 1/2 shot
Milk, until you think you've got enough liquid to fill whatever glass you're pouring this into.
Shake vigorously. (did you remember to put the lid on the shaker? 'Cause if not, you now have a big mess)
Pour into your glass, I chose a martini glass.
Gulp..errr sip.. and enjoy!
 Ingredients:
Pinnacle Whipped Cream Vodka
Hazelnut Bailey's
Disaronno
Kahlua
Milk/Cream
How to put it together:
In a shaker, toss in 3 pieces of ice.
After that, slosh in some vodka. If I had to wager a guess, 1 shot
Then, splash of Kahlua, probably 1/2 shot
As you can see in the picture, I used a nip of Baileys.. this is 5mL (or roughly 1.25 shot)
Disaronno, 1/2 shot
Milk, until you think you've got enough liquid to fill whatever glass you're pouring this into.
Shake vigorously. (did you remember to put the lid on the shaker? 'Cause if not, you now have a big mess)
Pour into your glass, I chose a martini glass.
Gulp..errr sip.. and enjoy!
Nutella & Peanut Butter Chocolate Chip Cupcakes
So, at some point yesterday afternoon, I got the inspiration to bake. I'm not sure why, considering when it comes to baking my cakes for decorating, it's really a task I never look forward to. I'd much rather spend my hours bent over the cake adding color and detail. But, alas, I was in the mood to bake. My coworkers will tell you that it was because of the new employee at work. She bakes. My coworkers will tell you that since I've been so used to being the one who bakes all the time, and that her cookies just happen to shine over mine 100%, that I felt the need to step it up and bake. Perhaps I have. But really.. I was just browsing Pinterest and got inspired. It was also a Wednesday night and I didn't have to take the girls anywhere after work. It was also a way to procrastinate cleaning up the tornado of toys in my house. Besides, I'm glad there's someone else at work now who bakes. It's a relief really. That was a lot of pressure. <smiley face> And now there's none. Though they seem to think that putting us against one another is a good thing. Little do they know, we're starting to collaborate.
So, of course, when I'm in the MOOD to bake, I can't just whip out any old box mix and store bought icing and toss things in a bowl. No. That just simply won't do. I have to go out, over the top, and push limits.

Like I said, I was browsing Pinterest. There are thousands and thousands of links to all manner of food from the internet on here. And I tend to pin those that interest me, not for the exact recipe, but for the thought of "what can I do better" with that recipe. And last night I landed on a cupcake. I had pinned this some time ago, and it's certainly over the top. So indeed, I took it to the next level. And... since I have a lot of coworkers, I doubled the recipe. This will make just under 4 dozen cupcakes. Here's how I played.
Cake Ingredients:
2 cups all purpose flour
2 tsp baking powder
1/2 tsp salt
12 T unsalted butter, soft room temp
1 cup Nutella
1/2 cup creamy peanut butter
1 cup packed brown sugar
1 cup white sugar
4 large eggs
2 tsp vanilla
1 cup milk
2 bags (12oz each) semi-sweet chocolate chips (set 1/2 bag aside)
Pre-heat your oven to 350degrees
Bake for 20-22 minutes.
You will notice the cupcakes will get nice and puffy, but towards the 20 minute mark they will deflate and start to darken. At this point they are just about done. Toothpick the center and make sure it comes out clean (melted chocolate residue does not count)
Remove from the oven and let cool.
Now, it's time for frosting!
The recipe from the original pin was pretty weak and tasted like too much butter, so being a cake decorator I bumped up how much sugar was used in this recipe and not only naturally doubled it, but also made it taste less like butter and more like frosting. And again, this is doubled from the original I found.
12 ouces unsalted butter, room temp (this is about 2 sticks of butter)
4 cups confectioner sugar
1 tsp salt
1 cup creamy peanut butter (this I did NOT double, 'cause simply these things were getting far too sweet)
1 tsp vanilla
1 cup milk
Now, decorate it. Remember that remaining 1/2 bag of chocolate chips? Put those in a microwave safe bowl and microwave at 30 seconds at a time, stirring between each until they have melted.
Using the same spoon you are stirring with, simply draw it through the chocolate and drizzle over the cupcakes in your desired pattern.
Serve with Milk. You will need it.
Now... want to kick it up a notch? Fellow baking coworker and I thought these would be AMAZING with some crispy fresh bacon bits on top. Salty and sweet. Oh yes. Maybe next time.
So, of course, when I'm in the MOOD to bake, I can't just whip out any old box mix and store bought icing and toss things in a bowl. No. That just simply won't do. I have to go out, over the top, and push limits.

Like I said, I was browsing Pinterest. There are thousands and thousands of links to all manner of food from the internet on here. And I tend to pin those that interest me, not for the exact recipe, but for the thought of "what can I do better" with that recipe. And last night I landed on a cupcake. I had pinned this some time ago, and it's certainly over the top. So indeed, I took it to the next level. And... since I have a lot of coworkers, I doubled the recipe. This will make just under 4 dozen cupcakes. Here's how I played.
Cake Ingredients:
2 cups all purpose flour
2 tsp baking powder
1/2 tsp salt
12 T unsalted butter, soft room temp
1 cup Nutella
1/2 cup creamy peanut butter
1 cup packed brown sugar
1 cup white sugar
4 large eggs
2 tsp vanilla
1 cup milk
2 bags (12oz each) semi-sweet chocolate chips (set 1/2 bag aside)
Pre-heat your oven to 350degrees
- Combine milk and vanilla in a bowl, set aside
- Combine flour, powder, salt in a bowl, set aside
- In your mixer, beat the butter, brown sugar and white sugar until light and fluffy
- Add the eggs and blend until smooth
- Mix in the Nutella and Peanut butter
- Add 1/2 of the flour mixture and blend until combined
- Add 1/2 of the milk and blend until combined
- Add remaining flour, blend, add remaining milk, blend
- Remove bowl from mixer and add 1.5 bags of of the chocolate chips and fold in by hand with a spatula
Bake for 20-22 minutes.
You will notice the cupcakes will get nice and puffy, but towards the 20 minute mark they will deflate and start to darken. At this point they are just about done. Toothpick the center and make sure it comes out clean (melted chocolate residue does not count)
Remove from the oven and let cool.
Now, it's time for frosting!
The recipe from the original pin was pretty weak and tasted like too much butter, so being a cake decorator I bumped up how much sugar was used in this recipe and not only naturally doubled it, but also made it taste less like butter and more like frosting. And again, this is doubled from the original I found.
12 ouces unsalted butter, room temp (this is about 2 sticks of butter)
4 cups confectioner sugar
1 tsp salt
1 cup creamy peanut butter (this I did NOT double, 'cause simply these things were getting far too sweet)
1 tsp vanilla
1 cup milk
- Beat the butter and peanut butter in a bowl. Use your whisk beater so the butter can get whipped and not be clumpy, no one wants to get a lump of butter in their mouth when eating frosting.
- Add the vanilla to your cup of milk
- Add the salt into your sugar
- Add 1 cup of sugar and beat on low until incorporated
- Add a splash of milk and beat on high
- Return mixer to low and add more sugar
- Alternate sugar/milk until it's all incorporated
- Beat on high to get a nice fluffy frosting.
- If you want it thicker, add more sugar.
Now, decorate it. Remember that remaining 1/2 bag of chocolate chips? Put those in a microwave safe bowl and microwave at 30 seconds at a time, stirring between each until they have melted.
Using the same spoon you are stirring with, simply draw it through the chocolate and drizzle over the cupcakes in your desired pattern.
Serve with Milk. You will need it.
Now... want to kick it up a notch? Fellow baking coworker and I thought these would be AMAZING with some crispy fresh bacon bits on top. Salty and sweet. Oh yes. Maybe next time.
Thursday, December 27, 2012
White Lasagna
 I adore lasagna. Could eat it every day if I had to. What's not to love? Pasta, sauce, and cheese and cheese, and more cheese! Growing up, my mom made the best lasagna and I of course carry on that same recipe, but seriously, no one ever makes it as good as mom does. But I like to think I hold a small flame to her, she did teach me after all. I don't get red-sauce dishes very much in my house. Neither my oldest child or my husband likes tomato sauce. Though, husband has been known to enjoy the family lasagna recipe. I was so craving this a few weeks back however that I had to adapt the recipe. I figured, if my daughter doesn't eat red sauce, then I'll make it with white sauce.
I have to say, it turned out pretty darn good! Only change is that next time I will use MORE sauce, and perhaps if time allows, I will make my own white sauce. But when you're a full time working mom of two, with a busy household, making your own Alfredo sauce is a luxury you can't always have time to afford. So, this recipe is truly "semi-homemade" and so simple!
Ingredients:
- 1 lb Ground beef (or turkey)
- 1 pkg mushrooms, sliced
- 2 jars Alfredo sauce (or homemade)
- 1 box lasagna noodles
- 1 pkg chopped spinach (defrosted and drained)
- Salt/Pepper
- 16oz Ricotta cheese
- Parmesan cheese
- 2 pkgs shredded mozzarella cheese
- Boil your lasagna noodles according to directions on the box, to al dente
- In a large skillet, cook up the ground beef and sliced mushrooms.
- Drain off any excess fat.
- Pour in the Alfredo sauce and bring to light simmer. Set aside.

- In a large 13x9 lasagna pan, spread some of the sauce on the bottom, this prevents the noodles from sticking.
- Then lay your noodles over the bottom of the pan, in one layer, covering the entire bottom of the pan, one layer of noodles only..
- On top of the noodles, spread ricotta. Honestly, just use your fingers to press it in and around, makes it much easier. Just enough to cover the noodles, as shown.
- On top of the ricotta, sprinkle on the chopped spinach. Just a bit, maybe 1/3 of what you have in the package.
- On top of the spinach, sprinkle on your mozzarella cheese, then on top of that, shake on the Parmesan cheese.
- At this layer, you will now pour on more sauce/meat, get it wet, but dont' use it all, you need to have enough for at least one more layer.


The final layer should end with Mozzarella cheese and just a smattering of spinach for color.

Place dish into a 350 degree oven for 40-50 minutes until the tops are golden brown and sauce is bubbling.

Cut into squares, serve and enjoy!
Jenn's Beef Brisket a la N.E Boiled Dinner
New England Boiled Dinner. Take an extra salty, briny piece of meat, toss it in a pot of water, boil the life out of it, toss in potatoes, root veggies and cabbage. Serve. With mustard and/or vinegar. A meal that was foreign to me until I met my husband's family some odd years ago now. The first time this was served to me, I naturally proceeded with caution. It all looked like the same gray matter sitting on a plate in front of me. But those around me couldn't shovel it into their mouths quickly enough, so I proceeded. And yeah, well, the rest is history. It wasn't long until I was making my own boiled dinner at home. But this isn't an entry about New England Boiled dinner.... well, not quite.
Last year, I was in the mood for boiled dinner, but it was the wrong time of year to find corned beef brisket at the store. At least, MB and S&S weren't carrying it and I wasn't going to S's. So, I asked the butcher if he had brisket. Stupid question Jenn. I wasn't paying attention to what I was asking. I had simply said "brisket" and not "corned beef brisket." The butcher replied kindly and disappeared into the back room, returning with this enormous 5lb hunk of beef, which I HAD to take home, he had special cut it for me. Thankfully, beef at the time wasn't outrageously priced so I didn't go bankrupt at checkout. Went home with my potato, cabbage, parsnips, carrots and set to work boiling the water. Only to realize that "the package" of spices was missing. It was then that it finally dawned on me... this was not corned beef brisket... this was just simply beef brisket. What the HECK do I do with this!?
A quick search on the internet produced several brines and methods to make your own pickling spice to produced the "corned" part of beef brisket... but that took 2-3 days to complete properly. I wanted boiled dinner now, not three days from now. Further searches produced results about others who had run into a similar scenario, no not where someone mistakenly got just beef and forgot the corned... but where the spice packet had been left out of their package of corned beef. Reading several question and answer sites I finally came up with the spices I wanted to use. Tossed them all into the pot, boiled this plain old beef brisket up for about 3 hours, tossed in the veggies and served. It was "OK." It was certainly edible. Both Rob and Kass at it, and since the butcher had given me enough to feed a family of 8, I had plenty of leftovers and lived off this for more than a week for lunch.
Fast forward to last night. I've improved my recipe and it was AMAZING. So, why not share it with you?

First thing we need to do here though is finally establish my measuring techniques, because you will surely need it this time. I palm measure. Here's what I mean.
 Hold your hand out in front of you. Cup it.
You'll notice that you've now created a small divot in the palm of your hand. The lowest point, the orange circle in the picture is #1, typically about a teaspoon. The next higher point, pour to the red line, and that can be a teaspoon to one tablespoon, depending on how cupped your hand is. The next higher point over that is the green circle, easily 2 tablespoons, but again, depends on how cupped your hand is. Imagine an orange just sitting in there nicely with your hand cupped around it. That's about right.
Now that you know the approximate measurements, here are the ingredients to Jenn's Beef Brisket.
Add your spices.
In the "Green Measurement" add the following:
Drop in 3 cloves of garlic, peeled and chopped in half
Your house is going to smell AMAZING while this is happening. :-)
After the 2 hours have completed, your meal is done. Grab some serving trays to display it all in, or just serve right from the pot. Minus the beef of course, you'll need to shred/cut that.
You will also be left with a super flavorful beef broth. Make soup, or freeze for later.
Enjoy!!
Last year, I was in the mood for boiled dinner, but it was the wrong time of year to find corned beef brisket at the store. At least, MB and S&S weren't carrying it and I wasn't going to S's. So, I asked the butcher if he had brisket. Stupid question Jenn. I wasn't paying attention to what I was asking. I had simply said "brisket" and not "corned beef brisket." The butcher replied kindly and disappeared into the back room, returning with this enormous 5lb hunk of beef, which I HAD to take home, he had special cut it for me. Thankfully, beef at the time wasn't outrageously priced so I didn't go bankrupt at checkout. Went home with my potato, cabbage, parsnips, carrots and set to work boiling the water. Only to realize that "the package" of spices was missing. It was then that it finally dawned on me... this was not corned beef brisket... this was just simply beef brisket. What the HECK do I do with this!?
A quick search on the internet produced several brines and methods to make your own pickling spice to produced the "corned" part of beef brisket... but that took 2-3 days to complete properly. I wanted boiled dinner now, not three days from now. Further searches produced results about others who had run into a similar scenario, no not where someone mistakenly got just beef and forgot the corned... but where the spice packet had been left out of their package of corned beef. Reading several question and answer sites I finally came up with the spices I wanted to use. Tossed them all into the pot, boiled this plain old beef brisket up for about 3 hours, tossed in the veggies and served. It was "OK." It was certainly edible. Both Rob and Kass at it, and since the butcher had given me enough to feed a family of 8, I had plenty of leftovers and lived off this for more than a week for lunch.
Fast forward to last night. I've improved my recipe and it was AMAZING. So, why not share it with you?

First thing we need to do here though is finally establish my measuring techniques, because you will surely need it this time. I palm measure. Here's what I mean.

You'll notice that you've now created a small divot in the palm of your hand. The lowest point, the orange circle in the picture is #1, typically about a teaspoon. The next higher point, pour to the red line, and that can be a teaspoon to one tablespoon, depending on how cupped your hand is. The next higher point over that is the green circle, easily 2 tablespoons, but again, depends on how cupped your hand is. Imagine an orange just sitting in there nicely with your hand cupped around it. That's about right.
Now that you know the approximate measurements, here are the ingredients to Jenn's Beef Brisket.
- 1 Beef Brisket, not too fatty, but not without fat
- Bay Leaves
- Coriander
- Whole cloves
- Whole all spice
- Mustard Powder
- 3 cloves garlic
- Onion powder
- Salt
- Whole Pepper
- Water
- Root Vegetables (Russet Potatoes, Carrots, Turnip, Parsnip - all or some, depends on how many people you're feeding)
- Head of Cabbage
Add your spices.
In the "Green Measurement" add the following:
- Coriander
- Whole cloves
- Mustard Powder
- Salt
- Whole Pepper
- Whole All spice
- Onion powder
Drop in 3 cloves of garlic, peeled and chopped in half
- Bring everything to a boil, turn back heat to Medium and let simmer/boil for 1.5 hours.
- Now... this is for a beef brisket that shreds but does not fall apart on its own. If you want the brisket to fall apart on it's own, boil for 2.5 hours. Otherwise, this makes a nice beef that's tender but may still want a knife to cut the shreds. It WILL still shred, just not fall apart on its own. Adjust to your taste.
- Meanwhile, cut your root vegetables into big chunks. Carrots should just be cut in half, potatoes quartered, parsnip sliced and quartered.
- After 1.5 hours, you'll want to start progressively adding the vegetables for the last 30 minutes, the denser veggies first.
- Add another "Red Measurement" of salt at this point
- Carrots, Parsnips, Turnips, Potatoes, Cabbage last. Let the one veggie boil up for 5-10 minutes before adding the next.
Your house is going to smell AMAZING while this is happening. :-)
After the 2 hours have completed, your meal is done. Grab some serving trays to display it all in, or just serve right from the pot. Minus the beef of course, you'll need to shred/cut that.
You will also be left with a super flavorful beef broth. Make soup, or freeze for later.
Enjoy!!
Thursday, December 20, 2012
Copious Cookies and Kahlua too!
I like to bake. You know this. Although, I'm not a fan of baking cakes (just decorating them). But I am a fan of baking pastries, pies, and cookies. Oh do I love to make cookies. So anyone who knows me knows that come December, my kitchen is overflowing with copious counts of cookie dough. You walk into the kitchen during one of my all day cooking marathons and you'll find me covered in flour, standing in sugar and licking a beater or spoon full of dough.
Now, I don't bake just one kind of cookie en masse. No. I do it up right. I bake a minimum of 6 different kinds of cookies, 2 batches each. A typical batch is 2 to 4 dozen. You do the math. Yes, cookies cover the counters, and my kitchen table, and my dining room table. My husband loves it.
I have a book that I received from my husband several years ago for Christmas and it's 400+ pages or nothing but cookies. So this cookie cookoff with myself is really his fault. The first year I had it, I went through page by page and tagged several to try. Starting off that year I baked 8 different kinds of cookies. It was a 12 hour day in the kitchen, with one oven and 2 cookie sheets. Took them all to work in Christmas tins and tupperware. Huge hit, of course. Did the same the following year, and again the next, now with more cookie sheets. Had to take a year off due to pregnancy but came back the following years just as strong. And here I was again this year with 2 ovens, 8 cookie sheets, 2 Kitchen Aids and one hand mixer. It was "just" an 8 hour session this year, thanks to two kids at my legs... but followed with two more nights later that week to get to my 8 kinds of cookie.
I vary what I make from year to year. I have my constants like chocolate chip, white chocolate chip and a peanut butter. But I still like to try a new one every year. This recipe is this year"s new one. It's one I had marked a few years ago and added a post it on with notes. The original recipe is a butterscotch base with a pecan on top. I decided to change it up and play. I have modified the recipe so that the cookie mimics a chocolate trifle.
Now in all fairness I had no idea what chocolate trifle was until I met my husband's family, This was a dessert they had after holiday meals. Chocolate cake, chocolate pudding, crushed heath bar, whipped cream...and... Kahlua, ever so lightly drizzled over the cake. A-mazing. I have of course played with this recipe several times as well, one of my favorite versions include Oreos. So when I read this cookie recipe that was a butterscotch pudding base, I noted that switch to chocolate and Kahlua drizzle. This year was the year to do it, and they are stupidly easy! They are my new go to dough for last minute cookies.
Chocolate Trifle Kahlua Pudding Cookies
 Ingredients
Drizzle/Dip on Top
When your cookies are cool enough, use the drizzle by dipping in a spoon and zig-zagging across the cookie, or just dip the cookie in and put back on the wire racks to set. While the drizzle is still is still wet, sprinkle just a touch of heath bar on top.
Serve this cookie with the following cocktail:
1 part vodka
1 part Kahlua
1 part Bailey's
2 parts milk or cream
ice into a shaker, shake well, pour into martini glass
---------------------------------------------------------------------------------------
And in case you thought I was kidding about the massive amounts of cookies:


Now, I don't bake just one kind of cookie en masse. No. I do it up right. I bake a minimum of 6 different kinds of cookies, 2 batches each. A typical batch is 2 to 4 dozen. You do the math. Yes, cookies cover the counters, and my kitchen table, and my dining room table. My husband loves it.
I have a book that I received from my husband several years ago for Christmas and it's 400+ pages or nothing but cookies. So this cookie cookoff with myself is really his fault. The first year I had it, I went through page by page and tagged several to try. Starting off that year I baked 8 different kinds of cookies. It was a 12 hour day in the kitchen, with one oven and 2 cookie sheets. Took them all to work in Christmas tins and tupperware. Huge hit, of course. Did the same the following year, and again the next, now with more cookie sheets. Had to take a year off due to pregnancy but came back the following years just as strong. And here I was again this year with 2 ovens, 8 cookie sheets, 2 Kitchen Aids and one hand mixer. It was "just" an 8 hour session this year, thanks to two kids at my legs... but followed with two more nights later that week to get to my 8 kinds of cookie.
I vary what I make from year to year. I have my constants like chocolate chip, white chocolate chip and a peanut butter. But I still like to try a new one every year. This recipe is this year"s new one. It's one I had marked a few years ago and added a post it on with notes. The original recipe is a butterscotch base with a pecan on top. I decided to change it up and play. I have modified the recipe so that the cookie mimics a chocolate trifle.
Now in all fairness I had no idea what chocolate trifle was until I met my husband's family, This was a dessert they had after holiday meals. Chocolate cake, chocolate pudding, crushed heath bar, whipped cream...and... Kahlua, ever so lightly drizzled over the cake. A-mazing. I have of course played with this recipe several times as well, one of my favorite versions include Oreos. So when I read this cookie recipe that was a butterscotch pudding base, I noted that switch to chocolate and Kahlua drizzle. This year was the year to do it, and they are stupidly easy! They are my new go to dough for last minute cookies.
Chocolate Trifle Kahlua Pudding Cookies
 Ingredients
- 3/4 c sugar
- 2 eggs
- 1/4 margarine, melted
- 1 package of instant chocolate pudding
- 1 bag crushed heath bar
Drizzle/Dip on Top
- 1 cup confectioner sugar
- 2-3T of Kahlua
When your cookies are cool enough, use the drizzle by dipping in a spoon and zig-zagging across the cookie, or just dip the cookie in and put back on the wire racks to set. While the drizzle is still is still wet, sprinkle just a touch of heath bar on top.
Serve this cookie with the following cocktail:
1 part vodka
1 part Kahlua
1 part Bailey's
2 parts milk or cream
ice into a shaker, shake well, pour into martini glass
---------------------------------------------------------------------------------------
And in case you thought I was kidding about the massive amounts of cookies:


Subscribe to:
Posts (Atom)